It doesn’t matter if you practice video editing on a professional or non-professional level, time will come when you’ll have a group of really large video files which you will have to edit on Windows 10. At this point, how do you get the job done without a lot of hassle?
In recent times, online video editors — also known as cloud-based video editors — are gradually catching up to offline video editors in popularity.

But if you’re going to be editing large video files on Windows 10, you’d need to be sure about what type of video editor is best-suited for this purpose.
Here, you’ll get to know a few reasons why offline video editors are better for editing large video files along with a quick step-by-step guide on how to edit large video files on Windows 10.
Let’s hop into it.
Quick Overlook
Editing Large Video Files on Windows 10: Offline Vs. Online Video Editors
Offline and online video editors both have their perks. But when it comes to editing large footages, online video editors have done so little to impress, especially for folks who are just getting started with video editing.
Here are some reasons why online video editors are not great for this purpose.
Slower Upload and Rendering Times
Indeed, video files are naturally large, and in recent times when 4K and 8K videos are trending, video files are getting even larger. Consider the time it would take to upload a one-hour video to your cloud-based editor along with the time it would take to render your edited footages. This can be painfully slow, especially if your internet signal is not in its prime.
Worse, you might lose your files if there is a glitch with your internet connection!
Offline video editors take this specific stress out of the way. It requires a few minutes to get your video files into the video editor, and it takes even less to get them rendered.
Reduced Preview and Export Quality
Online video editors generally make use of ‘proxy files,’ which helps to improve responsiveness and maintain reasonable workflow. But this has its side effect on the quality of previews and rendered videos.
Absence of Several High-Quality Features
With most online video editors, you only get basic editing features, which may not be sufficient for complex video editing tasks. If you’d like to work with overlays, fades, Chroma Key, Ken Burns, and more, then you’d be better off using offline video editors.
This does not completely rule online video editors out of the picture. They are quite effective for collaboration and do not require any hardware specifications for your computer. But for the specific purpose of editing large footages, they’re not ideal.
How to Edit Large Video Files on Windows 10 in Three Steps
Having established that offline video editors are the best fit for this purpose, let’s take a look at how to actually edit large video files on Windows 10.
For this particular purpose, I’ll be making use of Animotica, which is a simple, yet feature-rich Windows 10 video editor suitable for both pros and newbies.
Feel free to make use of other video editors such as Final Cut Pro or Adobe Premiere Pro if you already have them. Otherwise, you might want to try Animotica.
I will be showing the steps using this software, but the concept remains the same for every other video editor.
With all that said, here are the simple steps you can take to effectively edit large video files.
Step 1: Import Your Video
Launch your video editor and click on Edit Video. On the new window, follow the prompts to navigate to where you’ve stored your video file.
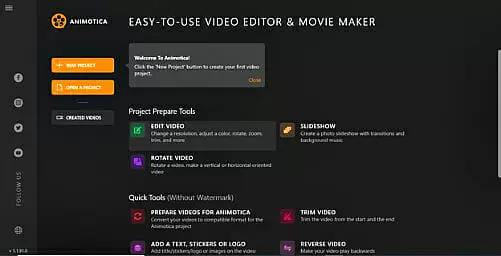
Select the video file and hit Open.
Having done this, you will be led to your project window, where you’ll get to finally work on your video file.
Step 2: Edit Your Video
When working on raw video clips, you will usually realize that there are several unnecessary parts included within the footage. This is indeed, a major reason for editing your videos: to get rid of unwanted parts!
The basic steps in video editing include the rough cut, fine cut, and final cut.
Don’t let yourself get stressed by the terminologies. I’ll explain them in a heartbeat.
Rough Cut
Here, you’re just cutting out the unwanted parts of the video. You can do this by using Animotica’s split and trim feature. To cut your video more accurately, you can make use of the Twist Control tool, which allows you to turn a wheel until you arrive at the part you want to trim off.
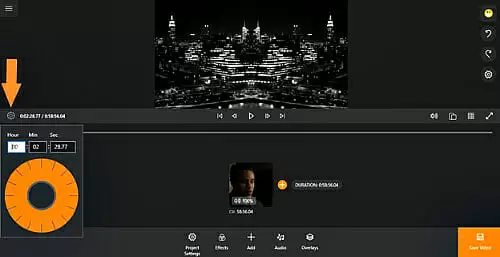
Alternatively, you can just drag the clip’s duration slider until you get to the specific point you wish to cut off.
To cut off a specific part, you need to first hit on the clip to reveal your editing options. Next, find the starting point of the part you wish to cut off, then hit Split.
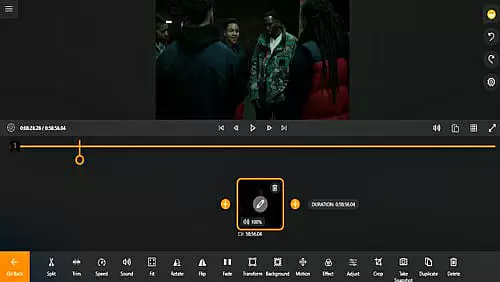
A new clip will be generated with your chosen starting point. Hit the Trim button and select Trim Slider.

On the new window, you can slowly drag the Start slider to the right to eliminate unwanted parts. Once you’ve done that, hit the Go Back button. You can repeat this process for any other parts you want to cut off.
Fine Cut
This focuses more on the tiny details of your video files, clip by clip. You try to find unwanted details you may have missed during the rough cut. If you’re sure you had a perfect rough cut, you can skip over to the final cut.
Final Cut
This is where you add the extra details that make your videos go from basic to epic. To do this on Animotica, tap on the clip you’d like to work on to reveal a bunch of editing options.
You can also add transitions, overlays, stickers, watermarks, voiceovers, background music, and more to your clips. This is also the stage where you apply some cool effects, such as the Green Screen, Ken Burns, etc.
Feel free to try them out, and if you make mistakes, CTRL+Z is your friend!
Step 3: Export Your Finished Video
When you’re done with editing, exporting your video should be the next thing on your mind. To do this, hit on Save.
The next window shows you options for Video Resolution and Bitrate.
You can adjust the video resolution all the way to 4K. However, the higher you go with your resolution and bitrate, the larger the file will be, and this will also result in relatively slower export.
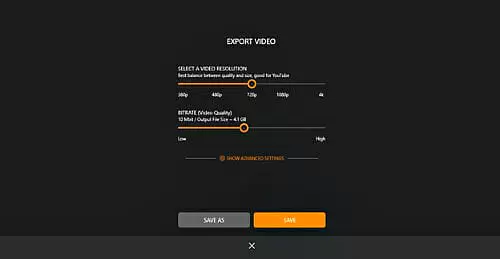
That said, go on and hit Save As. On the next window, input your desired file name and hit Save. Your video editor will now require a few minutes to completely render your video project. Once the rendering is complete, you can either let it sit safely in your storage or share it to YouTube directly from the app.
Conclusion
Editing large video files on Windows 10 is not that hard, especially when you’re making use of an offline video editor. It may seem overwhelming because you’d be doing a lot of editing, but with a calm and focused mind, you’ll be able to get the work done.
Ensure you take short breaks when you feel exhausted in order not to lose touch with your creativity. If this guide was worth your time, please let me know and also share with your friends!