77% percent of computers around the globe run Windows. Windows is everywhere. And most Windows users will agree that the operating system is pretty good. But everyone had their fair share of the “blue screen of death” and other tragedies.
System Restore is a built-in feature that creates a snapshot of your computer at a given time to prevent these tragedies from happening. It creates a “restore point” for the future. If there is a severe error from a driver or operating system update or another problem such as a registry error, you can restore your device to an earlier point. It allows you to fix the issue without losing relevant data.
System Restore is pretty helpful and can benefit 99% of users. But for some reason, the default settings disable System Restore. Thus, you have to manually enable it before Windows 10 can create these vital restore points.
Read on to learn more about System Restore and how to use it on your computer.
Quick Overlook
How System Restore Works
With System Restore, you can create a new restore point manually and automatically. You can also use it to roll back to existing restore locations or change configurations.
System Restore doesn’t need too much space or performance. And you can set it to run less often or capture a smaller snapshot if you need system resources for other tasks.
Finally, it backups an extensive collection of file types along with registry changes and most drivers.
Windows 10 will manage the space automatically. But, you can also choose to allow a certain amount of space under the Disk Space Usage section of System Restore setting. Use the slider to adjust the amount of space you want to reserve.
System Restore Isn’t the Same as a Backup
Always remember: System Restore is not the same as a backup. If you have a damaged hard drive or suffer file corruption, you won’t be able to recover your data. So be sure to use regular backups to the cloud and/or local storage devices still.
It’s best to set the backup to run weekly or more often. To prevent hackers and other parties from eavesdropping on data you back up over the internet, turn on your VPN. Downloads and uploads going through a VPN server increase not only the security but also your privacy. Keep safe and use System Restore and backups often.
How to Use System Restore on Windows 10
Since System Restore doesn’t work by default, you’ll need to turn it on yourself. You can do so by following these steps:
- Select the Search Bar on the Taskbar
- Search for Create a restore point, and select the top result to open System Properties.
- Select the Protection Settings section, choose the main System drive, and click the Configure button.
- Select the Turn on system protection option.
- Click the Apply button.
- Click the OK button.
Once you’ve finished the steps, Windows 10 will create restore points during new updates or specific system changes.
Beware that System Restore only applies to drives the Windows OS is installed on. It won’t apply to secondary/external storage devices.
Creating Manual System Restore Points
System Restore creates automatic checkpoints. But when you make significant modifications to your operating system, it’s best to create a manual restore point.
Follow these steps to create a System Restore Point:
- Click the search icon on the Taskbar
- Search for Create a restore point, and select the top result to open the System Properties window.
- Under the Protection Settings section, click the Create button.
- Create a name for the restore point
- Click Create
Recovering Using System Restore Points
If you need to recover to a restore point, you can roll back in a few steps. It’s an easy way to troubleshoot problematic updates and other issues. After opening the system restore menu, follow these steps:
- Click the System Restore button
- Select Next
- Select the restore point you want to use
- Click the Scan for affected programs button. Some apps may no longer be available if you added them after creating the restore point.
- Follow the steps. Once completed, your computer will sync to the target restore point.
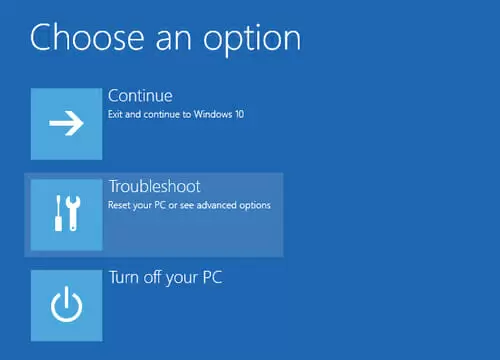
Advanced Startup System Restore
If your device is failing to boot correctly, you can use Advanced Startup to access the System Restore. First, you will need to boot to Advanced Startup:
- Press your power button
- Once the Windows logo appears, press the power button to interrupt the loading process.
- Repeat these steps two more times until device boots into recovery mode
Next, follow the steps to use System Restore. You can also do this using Windows Installation Media in the Repair section.
After following these steps, the system erases the changes that were causing issues. Thus, the functions of your device should go back to normal. System Restore is also available on earlier operating systems, including Windows 7 and Vista, but be sure to follow specific steps for it.